Tuesday, March 22, 2011

Rainbow Cookies a.k.a. The Coolest Cookies I've Ever Made


Last week we had our big Blue and Gold Banquet for the Cub Scouts with St. Patrick's Day theme since it fell on that green holiday.  On the invitations I asked the kids to make a creative dessert and told them there would be prizes for the best green outfits.  We had a big mystery dinner (where they didn't know what they were ordering...this was better in theory than in practice!) and had awards and lots of fun!


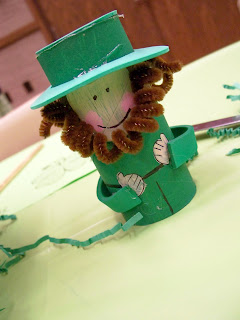
I made these funny little leprechauns for table decorations...


Prizes were given to the family who dressed up the best and to the best dressed person.  I had to give that last one to my 6 yo Sam.  He wore two green shirts, froggie jammie pants with green shorts over top, green froggie slippers, his green superhero cape, a green tie tied around his waist and a green snow hat. Yep. He really got into the spirt of it. And I forgot to take a picture! Ack! I get so busy at these things, conducting and keeping scouts in line and trying to make sure everything runs smoothly (or actually...trying to fix things when they DON'T run smoothly!)

 The dessert that won was this cool cake...

So fun, right?


When Emmett and I were trying to figure out what dessert to make we googled around and found a really cool rainbow cookie recipe....


Aren't these great?!  And you could do them in any colors! Red and green or pink and purple or...anything! We had a lot of fun squishing these together. You can find the recipe Here.


Play Dough Cookies (we prefer the name Rainbow Cookies! And we just made them without the lollipop sticks, although those would be fun, too.)

Ingredients

  • 3/4 cup butter, softened
  • 3 ounces cream cheese
  • 1 cup white sugar
  • 1 egg
  • 1 teaspoon vanilla extract
  • 2 3/4 cups all-purpose flour
  • 1 teaspoon baking powder
  • 1/4 teaspoon salt
  • assorted colors of paste food coloring
  • 24 lollipop sticks

Directions

  1. In a bowl cream butter, cream cheese and sugar until fluffy. Add egg and vanilla; beat until smooth.
  2. In a medium bowl combine flour, baking powder and salt. Add dry ingredients to the creamed mixture. Stir till soft dough forms. Divide dough into fourths. Tint each with a different food color. Wrap in plastic wrap and chill for 2 hours.
  3. Preheat oven to 350 degrees F (175 degrees C). Working with half of each color, shape dough into 3/4 inch balls and for each cookie place 1 pink, 1 green, 1 blue and 1 orange ball together to make 1 large ball. Shape into a 12 inch long roll (like a snake), starting at one end, coil roll to make a 2 3/4 inch round cookie. Place cookies 3 inches apart on lightly greased baking sheet. Carefully insert lollipop sticks into bottoms of cookies.
  4. Bake cookies for 8 minutes or until lightly browned. Cool and store in an airtight container.
I joined up with these Linky Parties...

Today's Creative Blog and...

all crafts Homemade Projects ~ Add Yours!  

Monday, March 21, 2011

Our Poet Tree

Product DetailsFor family night last week, we talked about the importance of being creative. I got the idea from reading a Fancy Nancy book. Yep, gotta love that little diva. At least, we do in our house.  It was the one called Poet Extraordinairre. 

Anyways, Fancy Nancy's class makes a Poet-Tree and writes poems on the leaves for their tree.  What a great idea, right? And since I like any excuse to encourage creavity in my family, we made our own!


Here are some of the kid's poems...

Robots
By Sam

I like robots.
They are cool.
I wish I had one of my oen.

The Bus
By Weston

Once I went onto the bus.
I sat by a kid.
His name was Gus.
It turned out he was a squid.

It's Spring
By Emmett

It's spring it's spring
come out little flowers.
Come out little leaf's.
come out little fruit.
come out little bushes.
come out little rose bushes.
Come It's spring. It's spring.
Now let's go outside to play on the swings
and the playground.

Unnamed
By Zoe

Poets are red.
And poets are pee.
We are fun.
And we love each other
Twinkle little star.

(I'm not sure Zoe totally got the concept of a poem... :)

We also watched this brilliant and beautiful video about the importance of creativity. It's made by The Church of Jesus Christ of Latter-Day Saints, but I think the message speaks to all faiths. It is lovely and moving.


all crafts Homemade Projects ~ Add Yours!


Tuesday, March 15, 2011

My Preschool Turn--Bears!

Today was my turn to teach the little mom-run preschool group I'm a part of.  I love teaching these little ones! They are so fun! And we were having such a good time that I didn't get many pictures taken. 

The theme for the month is Fairy Tales and since there are five girls but one boy I didn't want to do anything too over the top princessy. So, I chose Goldilocks and the Three Bears for a theme. And it's kind of odd that it's considered a fairy tale, right?

I asked the moms to have their child bring a teddy bear with them and while we waited for the last little girl to show up, I turned on the song Pots and Pans on the CD Dog Train (anyone else in love with Sandra Boynton's CDs?) so they could dance with their bears. We boogied for a bit and then we sat down and we lined the bears up in relation to their size.

Next I told them the story of Goldilocks with their help. Then we read the book Dusty Locks and the Three Bears, a cute western retelling of the story. Then it was time for some free play time.


I had gotten out our box of play food and a couple registers and I encouraged them to make some food for their bears or play store. It's cute to hear them playing with each other and their sweet little conversations.

Then we made these fun peanut butter bear cookies together....(please ignore my stained pan :)


Peanut Butter Teddies
(recipe found Here)

Ingredients

  • 1 can (14 ounces) sweetened condensed milk
  • 1 cup creamy peanut butter
  • 1 teaspoon vanilla extract
  • 1 egg
  • 2 cups all-purpose flour
  • 2 teaspoons baking soda
  • 1/2 teaspoon salt
  • 72 miniature semisweet chocolate chips (about 2 teaspoons)

Directions

  • In a large bowl, beat the milk, peanut butter, vanilla and egg until smooth. Combine the flour, baking soda and salt; add to peanut butter mixture and mix well.
  • For each pear, shape the dough into one 1-in. ball, one 3/4-in. ball, six 1/2-in. balls and one 1/4-in. ball. On an ungreased baking sheet, slightly flatten the 1-in. ball to form the body. Place the 3/4-in. ball above body for head. For limbs, place four 1/2-in. balls next to the body.
  • For nose, place the 1/4-in. ball in the center of the heat. Add two chocolate chips for eyes and one chip for belly button. Bake at 350° for 6-8 minutes or until lightly browned. Cool on baking sheets. Yield: 2 dozen.
As these cooked I tried to teach the little ones step by step how to draw a teddy bear using circles. This was interesting. Some of them waited to follow the instructions. And some of them couldn't wait and jumped ahead. And some needed extra encouragement. They are so wonderfully different! I love it. 

Here's how mine and  Zoe's pictures ended up...


Then as we waited for our cookies to cool off we read another book, one of my favorites, We're Going on a Bear Hunt. We added actions as the family had to go Through everything and it was great fun.

Then it was time to munch up our cookies. There was much silliness and laughter as we talked about eating their ears and heads and bellies.

We also talked about the differences between real bears and bears in the story (for example real bears do not wear boots or live in a cabin). And we did the little Teddy Bear, Teddy Bear rhyme....

Teddy Bear Teddy Bear turn around
Teddy Bear Teddy Bear touch the ground
Teddy Bear Teddy Bear climb the stairs
Teddy Bear Teddy Bear say your prayers
Teddy Bear Teddy Bear turn out the light
Teddy Bear Teddy Bear say good night!

I have such a great time with these little ones and I'm grateful Zoe and I are a part of this preschool group. I debated whether I'd have time for it this year. I'm always being pulled in a hundred different directions and I often just want to say NO when new opportunties come up. But I'm really really happy we've done this. I've loved watching Zoe interact with the other kids. Not to mention that I also get a few hours mostly to myself every week when it's not my turn (I have the wee baby with me, of course, but she doesn't talk, yet, so I get some quiet time!)

Monday, March 14, 2011

like mother like daughter...

The wee girl already has a thing for books. Such a smart little sweet pea.


But bad form, Molly. No peeking at the end!


What no time for a smile? Are you a bit busy or something?

Friday, March 4, 2011

Upcycled Tea Tray Tutorial

Oh, how my wee Zoe loves her tea set. We have countless tea parties where we pretend to sip cup after cup of hot cocoa.

And when her tea set is all set up on her pink table, she even manages to convince her older brothers to stop for a spell and have a cup of hot cocoa with her.

So, when I came across this tray I knew it was destined to become part of our tea party fun.


First we roughed it up a bit with some sand paper. Then we painted the side pieces of the tray.   I let Zoe pick the color. Of course, she chose...


Pink. This girl would live in a Pink World if she could manage it.

Since we were planning on covering up the bland paper in the bottom, it didn't matter if Zoe wasn't the most accurate painter. It would be much much easier to use spray paint on this project (for some of the reasons why spray paint is totally awesome, check out this fun post by my friend Sundi) but I opted for just the regular ol' acrylic craft paint. Because #1: It let Zoe be involved and #2: I didn't have any hot pink spray paint on hand. We used that all up on her little tea table.

I had some fun scrapbook paper for the tray down in my Pit of Despair (otherwise known as my sewing room/office) so I measured the tray, cut the paper to size and we spread some Modge Podge on the bottom of the tray and slapped it down, spreading it out all nice and neat. 

But the tray is wider than twelve inches, so we also had to add a border of a coordinating paper. Then we covered it all with another layer of modge podge. 


Then I lightly sanded the corners and edges of the tray, roughing it up a bit. Ryan sealed it with a clear coat spray (which I could have done myself, but he's just nice like that) and after it dried it was ready to play with!


You can't see her sparkley cape so good in this picture. 


She is also sporting a very nice cat mask. Yep, not just everyone gets to have a tea party with Super Kitty Cat and her doll, Pinky. :)